Monday, 31 August 2015

Happy Accident Photo that lead to Light Painting...

From the photograph where I had captured a couple walking down the hill with a torch by accident I decided to look at light painting in more detail. It seemed to be fairly easy to get an image to capture light (considering I had done it by accident) I roped my husband into help me do some quick tests.


Just a bit of fun but they came out much better than I thought, as we only went out with the camera and used the torch on my phone. We decided that we needed to think of ways to make the photos more interesting by trying to add colour, or get something drawn, will revisit this again.

I am looking forward to when the nights get a litter darker so I can get the boys to help me, I think they will really enjoy running around with little torches and seeing the results.

Saturday, 29 August 2015

Second Round of Pinhole Cameras....

After coming back from holiday we went and picked up the set of cameras put up at my parent's house, these were the second test set to see what would happen over a longer exposure.These cameras were positioned at the front and back of the house at different elevations to see if that would impact on the light exposure.


I am a little disappointed with this image as this camera was at the highest elevation, but it has not produced any light trails in the sky. I don't know if this has anything to do with the direction it was facing or the cloud coverage during the time it was up.


I like the start of the light trail that this photo has captured, I wish that I had now left it up longer, but I might go and replace it and leave it up for 6 months to see if the trails will develop further. I have edited this image and used a purple hue as it picked up the light trails and the detail of the image better.

I have now got 4 cameras still up (fingers crossed they are still there!), and I plan to make some more and get them up over the next few weeks. I think that leaving them for 6 months would make a big difference and also make sure they are facing south and not shaded.

Thursday, 20 August 2015

Holiday Snaps

Being away from the comfort of my own home to try out some night time shoots I realised that I need to plan them out a little better as it is boring! and cold! Anyway, I dealt with it as best I cold with the clothing and equipment that I had in order to get some star trails while we were away.

Doing this, especially at a location where it is pretty much pitch black makes trying to focus the camera to capture anything much harder so sadly some shots are a little blurry as I had no idea if I had focused on anything. This reminds me to take a high powered torch so I can create a focus point for the camera.


Photos from the first day at the little beach, the aim was to try and get the motion of the water in a long exposure. This had to be balanced with how bright it was outside so the exposure was very short indeed (one to five seconds in some cases). I love how they have come out though and can't wait to play with them in the editing software to see how I can manipulate them.


Night time shoot, and this is where the problems start as trying to focus the camera was difficult, however, the results were great. The castle looks fantastic in the photograph and the star trails looked super, just wish I could have stayed out longer but I was far too cold.


Happy Accident, I changed position to try and get the stars above the hill, however, as I started the exposure a couple were walking down the hill and their torch was picked up by the camera. I think this is great, I really like it when I end up with "accidents" in my photos. It makes me want to have a go at doing some light painting with the boys when the nights start getting darker earlier.


I have no idea how I didn't manage to get the camera focused correctly at this point. But I do like the detail in the star trails that I managed to capture, along with the washing line as well.

Thursday, 13 August 2015

Long Exposure Photography...water....stars and what is next?

I was feeling pretty good after the first few attempts at taking some images using long exposure and as we were taking a trip to Anglesey I took my camera as I would have some opportunity to take some photos.

What I did discover after setting up my camera was making sure it was steady, in focus and on the right settings. As much as I really enjoy taking photos of nature, I dislike the fact that nature moves constantly and gives some parts of my photos a blurry look. here are some of the results from the weekend away.


I was really pleased with how these turned out, in fact I was stunned as this was the first time out and about taking the photos of water. I then went and tested this same method out at the zoo to see if I could get some still water movement captured.


These photos of the small waterfall turned out better than I expected, I did have to spend time manipulating plants out of the way and also securing the camera into the ground.


The fountain at the zoo also provide to have some interesting water features once captured. I just thought it was pretty much still water, apart from the waterfall as the pond looked so calm. The long exposure shows that although it looks calm and unmoving that there is constant motion.

After the experiments with water I wanted to try out the star trails that I had read about, this took much more planning as we are not blessed with the clearest of skies at the best of times, and catching a night where there are no clouds and it is not windy or raining or really cold is pretty much remote. I have been lucky this past week that there have been a few clear nights to allow me to try out capturing the star trails. After some trial and error with setting and trying to reduce the amount of light getting in, and staying awake long enough for it to go dark is another big factor I forgot to mention, I did manage to capture a few decent shots.


I will need to work out a better power supply so I can have the camera running for longer to see if I can catch a whole rotation of the stars. We are off on holiday so I have packed up the camera and fingers crossed I will be able to get some excellent shots while away.

Final note.......AS Photography results are in and I got an A!

Friday, 31 July 2015

Long Exposure Photography Experiment One

After the success of the Pinhole Cameras it was time to try out long exposure using my digital camera. Before the first attempt I can't begin to tell you about the number of websites that I visited to read up on it and to also purchase the right equipment to get the best results.

Anyway, I tested out the equipment from the location of the seconds pinhole camera that looks out over the local motorway. I should say that at 3pm this motorway is very busy and the result made it look like a ghost road! I am wondering whether I should explore this branch of photography further and going into town when it is busy and get some "ghost" town shots.

A fantastic, and great way to test out the camera and the settings that I had carefully selected. Onto the next test.....

Second test of the day was to capture the changing of the sky as the sun was setting. I adjusted the settings slightly to factor in the changing of the light and conditions, who knew that I would be using Maths and Science to take photographs! So......here is the result, and again I am really pleased as it shows the motion of how the clouds move across the sky and the colours developing over time.


Next test it to try and capture water.....

Wednesday, 29 July 2015

Pinhole Cameras - Experiment Two

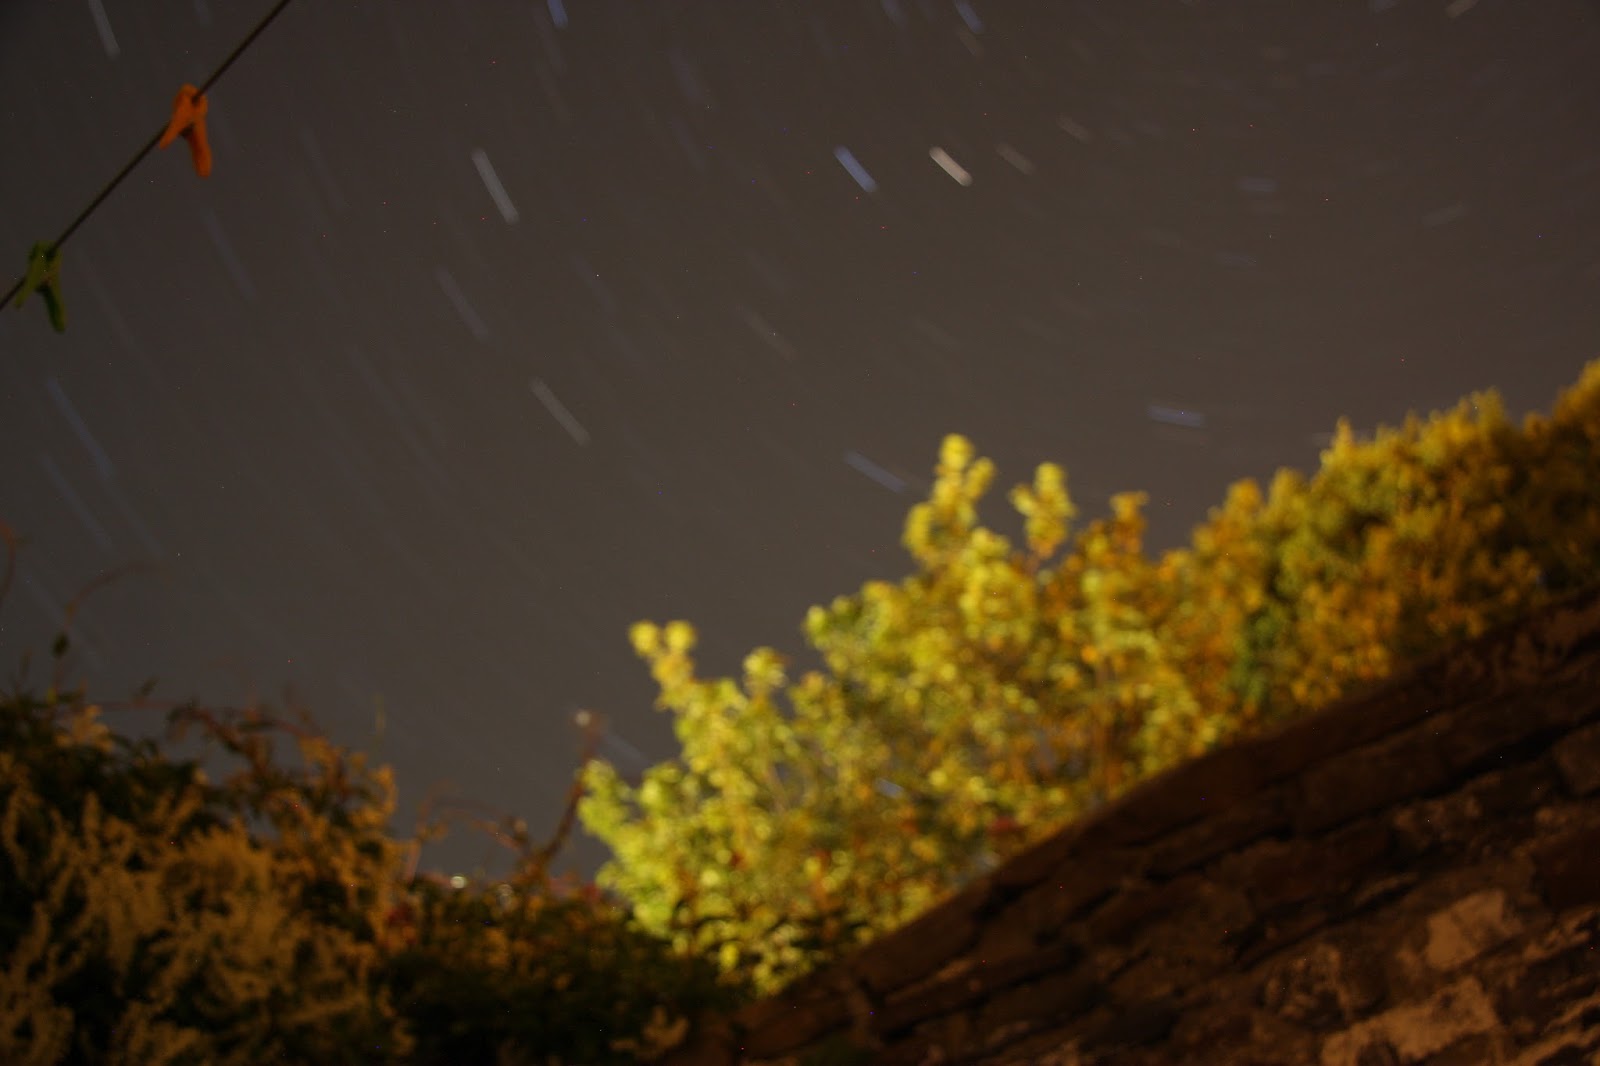
After the success of the first camera I decided to take a trip up to the second pinhole camera I had set up and see if it had worked. The first image is the original scan from the photographic paper straight from the camera. I was really excited to see that the image contained the light trail in the sky, which was what I had been hoping for after seeing some examples on other websites.


This is the image after the invert had been applied to the original, and it shows the light trail in the sky even more, and it has highlighted some of the details of the road which was really pleasing.

The next idea I had was to play with the photo editing software to see if I could alter the colours further using the hue and saturation settings, I also played with the brightness and contrast to see what other results I could get out of the image. I am pretty happy with the result, I was surprised with the colours in the sky that appeared, however, I did have to be careful when adding the editing so not to remove the details of the original image.


I am really excited about the results that I have been getting from the pinhole cameras, and these are only after 2 months of being up at the locations. I will be leaving the others out for longer. Fingers crossed they will still be there when I go to collect them! 

The original cameras are now reloaded with new paper and ready to go, along with 3 more that my son and I made earlier today. Just got to find some interesting locations!

Sunday, 19 July 2015

Pinhole Cameras Experiment One.....

It has been approximately 8 weeks since I put the first Pinhole Camera up at home as a test run to see if I had got the design right and whether the paper would work with the truly awesome weather we have in the North-West.

After taking down the camera, I realised that I needed to move fairly quickly to ensure that the scan was done swiftly so not to expose the image to much light in the transfer from the camera to the scanner. However, I discovered that getting the paper out of the can in one quick movement was not as easy as I thought it was going to be, and after a few frantic seconds I managed to place it soon the scanner, fingers crossed that I had not damaged the image. Upon placing the paper onto the scanner we realised (husband roped in at this point) that it did not want to scan without a preview first, big no, no when doing this kind of scanning. 


A quick changing of settings into "Professional" mode and we were off, with the scan taking the best part of 5 minutes as we put it on the highest settings to capture a decent image, and yes - the image is massive, 25% and it fills more than the whole of my screen.


Here is the original scan:


We were both impressed with the detail that had been captured by the camera in the short space of time.


Here is the final image, it has been inverted so it gives the illusion that it has been processed, however, this is a much easier method than using all the chemical to actually develop the photograph paper. I am really looking forward to collecting the other cameras that we have put up, and I need to make some more. 

I am really happy with how this experiment has turned out, big smiley face, the adventure with Pinhole Cameras continues.......